Oily in AZ

Converting to the Oil Lifestyle, one day at a time!


Leave a comment

Mineral Makeup?

Have you ever tried mineral makeup? I have not, but I think I am ready! Usually the stuff from the drugstore never matches my skintone, or it looks completely fake or “caked on”. So for years, I have used a department-store brand that I like. It gives pretty good coverage, nothing exciting.

Enter Young Living’s Savvy Minerals new makeup line! This stuff is ideal for sensitive skin, vegan-friendly, made with mineral-based ingredients, and formulated without talc, bismuth, parabens, phlathlates, petrochemicals, or synthetic fragrances.  Usually your foundation, powder, or eyeshadow has a looooong list of ingredients. Savvy Minerals’ foundation has only 6! Wow! Pretty impressive. I have seen some amazing before and after pictures on Facebook lately from people that have tried this makeup, and they look great. Very natural-looking, great coverage and enhances all the features, without looking like you have spent hours on your makeup.

All the colors are designed to blend nicely as well, so you don’t have to worry about getting the exact right shade. There are even how-to videos to show exactly how to apply everything! Awesome! This is one of the reasons I have never wanted to try the popular brand of mineral makeup, because it seemed like it would be too hard to apply correctly, or too much work. See for yourself how easy it looks:

Intro to Savvy Minerals by Young Living

I am ready to try it out. Who’s with me? 🙂

savvymineralsflyer_previewonly


Leave a comment

Pregnant??

Hey everyone, it has been a long time since I have posted anything, sorry about that! This last year has been crazy to say the least, mostly because we have welcomed a cute little baby boy into our family! Things are just starting to calm down, he is 4 1/2 months old now, and his big sister is a very helpful 3 years old. Maybe I can get an hour to myself now?? Lol!!

Anyway, when I found out that I was pregnant, I was familiar with a few of the oils that you probably should avoid at that time, because they might cause things like early contractions, or sometimes even miscarriage. Of course I did not want to take a chance that anything would go wrong by using an oil that I didn’t know the effects from. This is why I ordered Gentle Babies Essential Oils and Natural Remedies for Pregnancy, Childbirth, Infants and Young Children from Amazon. This book pretty much tells you what oils are safe during pregnancy and which ones to avoid. It is also a great reference for what to use on and with babies and kids.

Fortunately,  the only symptoms I had to deal with this time were about 4 weeks of all-day nausea. Not that this was minor or fun in the least, but I took the advice from this book and added 2oz. of NingXia Red each morning before breakfast. For some reason it helped, and I could get through the day and was able to eat without feeling horrible. I still like to drink the NingXia every day, just to keep my immunity up and have continued energy throughout the day. Another thing that was really helpful with sudden bouts of ugh feeling was to just smell some peppermint right out of the bottle. Clears your sinuses, too! Bonus!

My advice for anyone that is not too familiar with oils, or maybe doesn’t want to take the time to research them to find out which oils would be great for your specific needs, try NingXia Red. It is a perfect place to start using oils because there are oils mixed in with the juice, and gives support for many different body systems. Just 1-2 oz. per day, how easy is that? 🙂 If you want to get some NingXia but have never ordered from Young Living before, they actually have a starter kit that comes with 2 bottles and 30 single-serving packets of NingXia Red, NingXia Nitro (which is NingXia with a natural energy boost!), and a bottle of Stress-Away essential oil! That is totally my favorite oil because just smelling it is like a vacation in a bottle! After ordering this starter kit, you can order anything else you like from Young Living using your wholesale discount! Woo hoo!

Check out just some of the benefits of this super-juice below!

Ningxia Red graphic


Cooking with Essential Oils

Have you ever tried using Essential Oils while cooking? I love using oils like Lemon, Lime and Orange in cooking, especially when it is combined with other fresh ingredients to make a yummy guacamole or salsa! It is easier than ever now to know exactly which oils you can ingest and add to your recipes with Young Living’s new Vitality Oils collection. These oils include the same exact oils as before, but are labeled as dietary. Just look for the white-colored Vitality label!

Check out this recipe below from My Oily Kitchen to see how you can start using Essential Oils in your recipes!

*I only trust Young Living Essential Oils for using in cooking because of their Seed to Seal Promise. Find out more here.

My Oily Kitchen: Fruity Avocado Salsa featuring Young Living’s Vitality line of essential oils.

Source: My Oily Kitchen: Fruity Avocado Salsa


Leave a comment

Friday Fitness Day!

Ok people- how many of you made New Year’s resolutions to get healthier this year? How many of you have stuck to your resolution so far? 😉

I know it is very hard to stick to a strict diet and exercise plan, but what if you could get healthier without even worrying about that part first?

If you haven’t experienced the world of Essential Oils yet, you are definitely missing out. First of all, read here to find out all the benefits of oils for your overall health and well-being. It is amazing what one drop of oil taken from a plant can do for us! And the best part is the oils are completely natural and straight from plants, nothing else added! Young Living Essential Oils has their Seed to Seal promise (read more about it here) that basically guarantees that nothing else ever gets added to the oils after they are pressed or distilled from the plant. This is why they are the only company I trust to get my Essential Oils from. 🙂

So, if you haven’t gotten your oils yet, and you are totally ready, this month is the perfect time to start! Young Living is offering a promotion for this month only where you can buy a Premium Starter Kit for 10% off! Awesome!


Ok, now onto the Friday Fitness part. If you have already started using oils and are loving it, did you know that oils are great to use before, during, and after physical activity? For example, RC is great to rub a few drops on the chest and back of neck before activity to help keep you motivated for your workout. During your workout, maybe add a drop of Peppermint oil to your water for an extra burst of alertness. After, roll on some Deep Relief for those hard-worked muscles, or even some refreshing Cool Azul gel!

I just found out about a new product Young Living offers. It is perfect for those of you who are either already workout buffs and going to the gym every day, or those of you who are just starting! It is called the Active & Fit Kit, and it is a small kit made to take with you wherever you are getting active. It includes:

• Nylon carrying case with seven interior mesh pockets for five essential oil bottles, one Slique Bar, and one tube of NingXia Nitro; an exterior pocket; and a carabiner for easy attachment to any gym bag

• Cool Azul™ Sports Gel, 3.4 oz.

• Deep Relief™ essential oil blend, 5 ml

• R.C.™ essential oil blend, 5 ml

• Thieves® essential oil blend, 5 ml

• Copaiba essential oil, 5 ml

• Peppermint essential oil, 5 ml

• 3 AromaGlide® roller fitments

• Product information card

I love the case because it holds all the oils that you might use when working out, and it clips right onto your bag or even onto a belt loop. Now you don’t have to worry about leaving your oils at home when you go to workout! The product number is 5502, and you can order through your Virtual Office. I am totally putting this one on my next Essential Rewards order!!

Leave me a comment on how you use Essential Oils before, during, or after physical activity! 😀


2 Comments

DIY Tuesday: Homemade EO Gifts, Bonus Recipe!

med_hot-cocoa

I’m going to cheat on the DIY post today- I didn’t make this one up myself but sure wish I had. Recently I attended an online Young Living Homemade Gifts party on Facebook. It was great because I just sat at my computer and got all these great recipes and ideas for cute, thoughtful, and easy gifts to make using Young Living Essential Oils. This DIY recipe came from one of the ladies hosting this party, on her blog called All Things G&D. I love doing the fun make and take projects, and it’s even better when you can share your project with others!

I am really into my Christmas baking as well right now. I feel like I have been behind this year- between kids being sick, shopping, and going on a quick Disneyland trip, the past month has been crazy busy! Now is the time to catch up! Which brings me to this DIY recipe- it’s called Peppermint Chocolate Hot Cocoa Mix-In! This super festive, really easy, and pretty recipe would be great to give as a gift or have as part of a Hot Cocoa Bar at your holiday parties. I plan on putting pieces of this out along with whipped cream and extra marshmallows to add to some yummy Crock Pot Hot Cocoa at my family Christmas party this year.  Just the picture itself looks yummy- like a white/dark chocolate peppermint bark! But even better- you add a piece to your hot cocoa and as it melts in, you get an even richer, more chocolaty and minty cup of awesomeness! I am making this right now as I type, and I can’t wait to try it when it is done!

Here is the link to the blog post and recipe:

Peppermint Chocolate Hot Cocoa Mix-In.

Tell me what you think of this recipe, and if you would like more recipes in DIY Tuesday, or should I stick to the non-edible projects? 🙂


Leave a comment

Try DIY Tuesday (Sunday Edition): Homemade EO Gifts, Part 3!

Ok, this DIY might be one of my favorites. It is so easy, yet such a great gift and easily customizable! It’s lip balm! Who doesn’t need lip balm, especially in this cold and dry weather. Even better, it is made with totally natural ingredients so you don’t have to worry what those 11-letter words are you are putting on your lips. Thank you to my YL teammate Melissa for providing this recipe! 🙂

Cocoa-Mint Lip Balm

You will need:

6 small lip balm pots (5 gram size) or 5 empty lip balm tubes (I got mine on Amazon)

4 teaspoons coconut oil

2 teaspoons beeswax pellets (got these on Amazon as well, they were labeled organic)

6 semi-sweet chocolate chips

4-5 drops Peppermint Young Living Essential Oil

Directions:

First of all, you might want to spread out some newspaper, or even a larg cutting board on your work surface to protect it from hot oil and also from cleaning up a mess later! 😀

Spoon coconut oil and beeswax pellets into a glass bowl or jar (pyrex measuring cup would work great!) and microwave for approximately one minute, or until the beeswax looks melted. Stir with a metal spoon. Add chocolate chips and stir until everything is combined and melted. Then add the 4 drops Peppermint Oil and stir well. Quickly (and carefully, it’s hot!) pour the lip balm mixture into your pots or lip balm tubes. The lip balm hardens very quickly, so resist the urge to touch the top to check! You will leave a fingerprint in your pretty shiny balm, and no one wants that! 🙂 Put the lids on and stick on a small label showing what flavor the balm is. That’s it! Ready to give (or keep yourself!)

Some ways that this recipe could be customized would be to leave out the chocolate chips (especially for someone who is Dairy-free) and just make a peppermint flavored balm. You might want to add just a touch more beeswax pellets if you leave out the chocolate, because it might not harden as solid. You could also make a fruity flavored balm by using grapefruit, orange, or Citrus Fresh oils. You could also make a Cinna-mint flavor using Cinnamon and Peppermint oils. The possibilities are endless!

Just make sure, as always, that the Essential Oils you are using in your lip balm are 100% Therapeutic-Grade Essential Oils. The only oils I trust for this reason are Young Living Essential Oils. I know that there are no additives to my oils, only 100% pure oil- because of the Seed to Seal Quality Promise. You also want to make sure they are labeled as Supplemental, that way you know they are meant for ingestion- since they are being applied to your lips! 🙂

If you don’t have any Essential Oils of your own yet, click here to find out how to get some! 🙂


Leave a comment

Try DIY Tuesday (Saturday Edition): Homemade EO Gifts, Part 2

Today’s DIY gift is as fast and easy as they come, but one of my favorite things to make! It is so easy to customize and change for different seasons or moods. It’s Room Spray!

Everyone wants their house, car, office, linens, bathroom, or even gym bag to smell nice! But, no one wants the nasty chemicals that are inside the sprays you buy at the grocery store. This is why you should make your own using all plant-based ingredients so you can feel good about making your house smell good! This project is also a great one that the kids can help with. They can do the shaking part, the adding the oil drops part, and more shaking! Lol! room spray graphic

You will need:

1- 8oz spray bottle (I found a trigger-style sprayer works best for spraying the air or large areas. For a fancier feel to the bottle, get either a glass spray bottle or an aluminum bottle instead of plastic. You can find these on Amazon.)

Salt (Epsom or Sea Salt)

Water

Young Living Essential Oils- approximately 20-30 drops

Tag to hang on your bottle for gift giving with your spray name

Directions:

Put a few pinches of salt in the bottom of your empty spray bottle. Add your oils to the salt and swirl the bottle around to mix the oil into the salt long enough so there are no clumps left and the oil is absorbed. Fill the bottle with water, leaving enough room to screw on the spray top. Shake well, and spray wherever you need freshening! (Make sure to shake before using each time because the oil will still separate a little bit.)

At our Holiday Make & Bake & Take party, we made a Fall Room Spray. For the oil combination, we added 7 drops each of Young Living Orange, Nutmeg, and Clove Essential Oils. Some other great combinations would be:

Christmas Spray-

15 drops Young Living Christmas Spirit Essential Oil

5 drops Young Living Orange Essential Oil

Pine Forest Spray-

10 drops Young Living Evergreen Essence Essential Oil Blend

5 drops Young Living Lemon Essential Oil Blend

Spiced Cider Spray-

10 drops Young Living Thieves Essential Oil Blend

5 drops Young Living Orange Essential Oil

5 drops Young Living Lemon Essential Oil

2 drops Young Living Cinnamon Essential Oil

2 drops Young Living Clove Essential Oil

The possibilities are endless! Think of the combinations you like in your diffuser, and then just use about 4 times as much oil in your spray than you would in your diffuser, because there is a lot more water in the spray to dilute the oil.


As always, if you haven’t gotten your own Essential Oils yet, you can click here to find out how!


Leave a comment

December FREE STUFF!

Each month, Young Living offers free items you can receive with your order, just by ordering the stuff you would usually get! They have different rewards each month, and for the rest of 2015, one of the free things offered each month will be a 15ml bottle of oil!! I know I am a little late this month posting about the rewards, but this month has got to be the best free gift I have seen yet- you can get 2 bottles of oil, 30 ER points, AND an Everyday Oils Collection!!!!!!! This is the same set of oils that you got in your Premium Starter Kit! WOW!!! The total value of this month’s 300 PV promotion is over $250! Why not replace some of your oils you have used up, buy a few gifts, try a new supplement, and before you know it, you will get back almost as much as you have spent in FREE oils!!! I am so excited about this month’s promotion! You might want to hurry and place your order, because one of the items that was offered at the beginning of the month as part of the promotion has already ran out, so it was replaced with the 30 ER points. Don’t wait until the Everyday Oils kit is gone, too! :O

December

The gifts you will get with your order depend on how much PV you order each month. PV stands for Product Volume. Each item Young Living sells has a PV. The item’s PV is usually equivalent to the dollar amount of the item if it is a consumable (like oils or lotions). Some things have less PV than dollar amount, like diffusers. When you are viewing an item on the website, or in the product guide, the PV for each item is listed by the price. The free rewards items you can get each month start when your order is 190 PV. For me, this is not very hard to reach! :DThe reward tiers are 190, 250, and 300 PV. Sometimes the value of the rewards is over $100!!!!! When you place your order, the rewards you qualify for will automatically be added to your order, you do not need to add them to your cart, or put in any codes. You are also eligible to earn the rewards both using the Quick Order or Essential Rewards ordering! It’s that easy! Did I mention I love free stuff?


Leave a comment

Try DIY Tuesday (Friday Edition): Homemade EO Gifts!

Do you need some stocking stuffer ideas? Do you need something for the office gift exchange? How about that person that has EVERYTHING? Try these fun and easy DIY gifts made with YL Essential Oils.

Ugh, who has time to make gifts, you say? Well, recently I hosted a holiday themed Make & Bake & Take party at my house along with two ladies from our local YL team. Each guest that came made three gifts plus watched a pumpkin bread demo using oils, as well as drank festive drinks and ate snacks, all in about an hour and a half! Of course, if you make these gifts yourself it will not take that long, but you will have just as much fun! I will post one DIY per day, so you can try one at a time! Here we go!

1.Chocolate Jar Cake Infused with Young Living Orange Essential Oil

*A few notes- this cake can be made in a coffee mug if you just want a quick dessert for one. I put it in a jar for the ease of gift giving because of the nice lid, but if you can’t find the right size jar, you could just as easily mix all the dry ingredients together, pour in a Ziploc bag, and nestle into a cute coffee mug. Also, you might think that it looks kind of funny with the jar only 1/2 full of ingredients. I agree, and the ingredients will mix together if the jar gets jostled around. But, this much space needs to be left in the jar that is being used to “bake” your cake in because once you mix in the wet ingredients and cook, the cake will rise and expand (and explode all over your microwave if there isn’t enough space!).

Jar Cake graphic

Top of jar

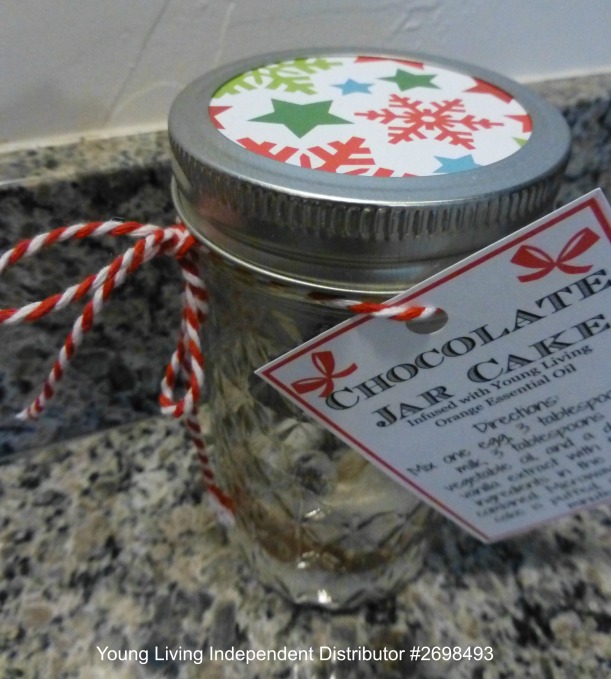
This gift is so easy to assemble and looks pretty neat, too. All you have to do is layer the ingredients, cut a pretty piece of paper to put on the top of the lid, and tie the instructions on with a nice ribbon. Done! Here are the directions:

You will need:

1- 12-oz jar or mug (I used a 12-oz size “Jelly Jar” Mason jar found on the Walmart website)

5 tablespoons sugar

3-4 drops Young Living Orange Essential Oil (You could also use  1-2 drops YL Peppermint Essential Oil instead)

2 tablespoons cocoa powder

1/4 cup flour

dash of salt

1 tablespoon semi-sweet or white chocolate chips

Instructions:

Mix sugar and Essential Oil in the bottom of the jar. Mix until the sugar has sucked up all the oil and no clumps remain. Layer the rest of the ingredients in the jar- cocoa powder, flour, salt, and chocolate chips. Screw on the top and tie on an instruction tag.

To bake the Jar Cake, stir all dry ingredients together in the jar. Add 1 egg, 3 tablespoons milk, 3 tablespoons vegetable oil, and a dash of vanilla extract. Mix until well combined. Microwave the jar uncovered on high until cake is puffed, about 1 1/2 minutes.

You can easily modify this recipe for Gluten-Free and Dairy-Free diets as well- just swap out the flour with a GF flour substitute, and the milk for a non-dairy milk like almond or coconut milk. Make sure your chocolate chips are GF and DF as well. 🙂

Here is the instruction tag you can print out on thick paper to attach to your jars for giving as gifts. Just right click on the graphic, and save to your computer. When you print it, select 9 to a page and they will print out the right size to cut apart and attach! 🙂

Chocolate Jar Cake label

***One more note- make sure that when you are using Essential Oils in your recipes, or putting in your water to drink, that you are using 100% Therapeutic-grade Essential Oils that are labeled as Supplemental. You want to make sure that there are no additives or chemicals in the Essential Oils that you consume, just 100% pure oil. This is why I only trust Young Living Essential Oils, because they have the Seed to Seal Quality Commitment. Please don’t consume anything you are not sure is 100% pure! 🙂

If you don’t have any of your own Young Living Essential Oils and would like to find out how to get some, click here!